As of late 2025, platform support for this new device type is still maturing. While major players like Apple and Google are still developing their support, SmartThings and Home Assistant have already implemented it, allowing for early adoption.
This guide will walk you through the process of connecting your existing smart speakers – such as HomePods, Google Nest speakers, and Sonos – to Home Assistant. We will then use a powerful third-party add-on to bridge them, creating virtual Matter-enabled speakers that you can control from other Matter platforms.
Prerequisite
Here are the items you will need to follow this guide:
-
A running instance of Home Assistant OS (This guide was tested on version 2025.11).
-
Internet access for downloading the add-on.
-
Smart speakers already connected to your network and recognized by Home Assistant (e.g., Sonos, Google Nest, or AirPlay devices like HomePod).
1. Connect speakers to Home Assistant
Before we can bridge the speakers, Home Assistant must be able to see them. For mainstream brands like Sonos or Google Nest, Home Assistant’s auto-discovery feature will likely find them on your local network as soon as they are powered on. You can then simply click ‘Configure’ from the ‘Devices & Services’ page to add them.
For other devices, like a HomePod, Home Assistant will discover it as an AirPlay device. This may require an extra authentication step where you input a verification code.

Once added, you can confirm they are ready by navigating to Settings > Devices & services > Entities and searching for media_player. All your controllable speakers will appear here. This is your chance to test them and rename their entity IDs for easier management later.
2. Install the Home-Assistant-Matter-Hub add-on
The magic of this guide comes from a third-party add-on called “Home-Assistant-Matter-Hub”. This project, based on the matter.js library from the Open Home Foundation, acts as a powerful Matter Bridge. It can take most device entity within Home Assistant and create a virtual Matter equivalent.
Navigate to Settings > Add-ons > Add-on Store.
Click the three-dot menu in the top-right corner and select ‘Repositories’.

Paste the following GitHub URL:
https://github.com/t0bst4r/home-assistant-addons
Then click +Add and Close the pop-up and refresh your add-on store (or click the three-dot menu and ‘Update’).
You will now see a new section for ‘Home-Assistant-Matter-Hub Add-ons’. Find and click on the add-on named ‘Home-Assistant-Matter-Hub’ and install it.

Wait for the installation to complete, then click Start.
3. Configure the Matter bridge
Now we will create a dedicated bridge just for your speakers.
Wait a minute or two for the add-on to fully initialize. Once it’s ready, click on the ‘Home-Assistant-Matter-Hub’ icon in your Home Assistant sidebar (if you don’t see it, go to the add-on page and click ‘Show in sidebar’).

Click Create new bridge. This will create a new virtual Matter bridge device.
Give the bridge a descriptive name, for example: ‘Speaker Bridge’.

Now, you must tell the bridge which devices to expose. In the Include entities section, select Domain from the dropdown menu, and then type or select media_player. This single filter tells the bridge to find all media_playerentities in your Home Assistant and add them to this bridge.
(Optional) If you have some media players you don’t want to expose, you can add them to the Exclude entities filter below.
Scroll down and click Add.

You will be returned to the add-on’s main page, where you will now see a new card for your ‘Speaker Bridge’ with a Matter QR code. This bridge is now “on” and waiting to be commissioned.
4. Add your virtual speakers to Matter
Now for the final step. Open a Matter platform that supports the ‘Video Player’ device type, such as SmartThings or Aqara Home.
In your chosen app (e.g., SmartThings), go to Add device and choose to add a Matter device.
Scan the QR code displayed on your ‘Speaker Bridge’ card in Home Assistant.

Your platform will add the bridge. Once added, you will see all of your media_player devices appear as individual Matter-enabled speakers.
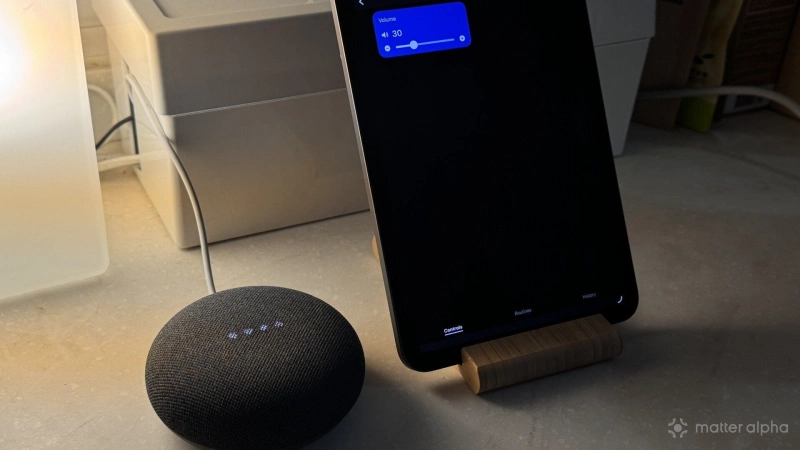
You can now control the volume and mute functions of these speakers directly from the SmartThings or Aqara app. These controls can be used in your automations – for example, you could create a ‘Night Mode’ automation that mutes all your home’s speakers, or a ‘Movie Time’ scene that sets the living room volume to a specific level.

5. Final check: enable auto-start
Finally, to ensure your new Matter bridge is reliable, go back to the add-on’s page in Home Assistant (Settings > Add-ons > Home-Assistant-Matter-Hub).
On the Info tab, make sure you have toggled on both Start on boot and Watchdog.

-
Start on boot ensures your Matter bridge starts automatically when you restart Home Assistant.
-
Watchdog will automatically restart the add-on if it ever crashes, ensuring your speakers remain available to Matter.
By using Home Assistant as the central hub, this matter.js -based Matter Bridge effectively upgrades all of your existing, non-Matter speakers, making them compatible with the new standard.
(Source: GitHub/t0bst4r; Image Source: Matter Alpha/Ward Zhou)