While there are some pre-built solutions, such as PCI-E cards, that allow you to boot your PC via a smart home platform, there are currently very few Matter-compatible options available on the global market. In this guide, we’ll walk you through a simple modification to enable your PC to boot using a Matter switch.
Pre-requirements
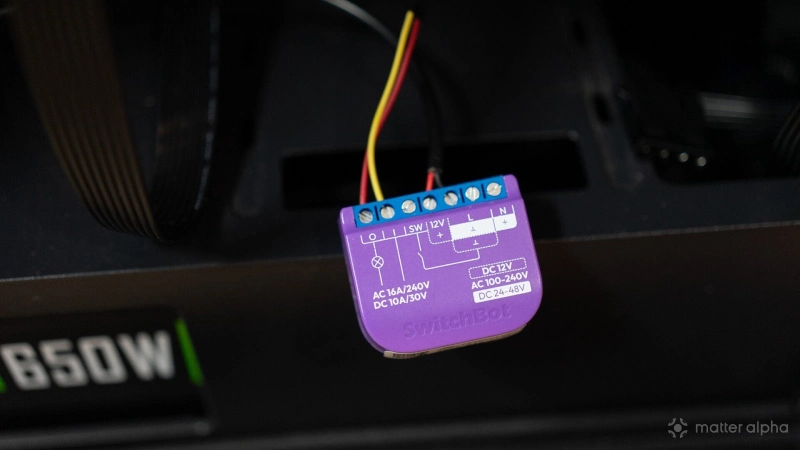
The guide utilizes a Matter smart relay with a dry contact, which is an ideal trigger for reed buttons like the PC power button. The relay sources power from the PC’s USB port through a 5V to 12V converter, enabling it to mimic the action of a physical power switch. Below are the materials you’ll need for this guide:
-
USB 5V to 12V converter cable
-
Sonoff MINI-D Switch or SwitchBot Relay Switch 1
-
Extra Dupont wires
-
PC power switch 2-pin cable separator (optional)
-
Magnetic sticker (optional)

BIOS settings
Since the switch needs to source power from the PC, there are specific BIOS settings that need to be configured. These settings may vary depending on the brand of your motherboard.
-
Enter the BIOS menu by pressing the Del key during boot-up. If that doesn’t work, search for the correct key or consult your PC manufacturer's documentation.
-
In the BIOS menu, locate settings such as Energy-related Products (ErP), Power Management, and USB S4/S5 Power.
-
Typically, ErP should be disabled, and USB S4/S5 Power should be enabled. To test this, plug in a USB device and check whether it receives power when the PC is powered off.
Wiring up
1. Power Off Your PC
To avoid damage or electrical shock, ensure your PC is powered off before proceeding. Open the PC case and locate a USB port that is convenient for wiring. It’s recommended to use a port located at the back of your case.

2. Install the 5V to 12V Converter
Plug the 5V to 12V converter into the USB port, then route the other end through the PCI-E blanking plate of the case.
3. Connect the Relay to the Smart Switch
Cut the connector, strip the wires, and connect them to your smart switch:
-
For the Sonoff MINI-D, connect the red wire to DC+ and the black wire to DC-.
-
For the SwitchBot Relay, connect the red wire to 12V+ and the black wire to L.
Power on your PC and check if the switch powers on. If the switch doesn’t turn on, double-check your power source and wiring connections.
4. Connect the Power Switch to the Smart Switch
Locate the POWER SW connector on your motherboard (usually near the edges).

Disconnect it, then use a 2-pin Dupont wire (male to female) to connect the motherboard to the smart switch:
-
For Sonoff: Connect NO and COM.

-
For SwitchBot: Connect O and I.

There is no need to worry about the corresponding connections here, as they simply allow the switch to toggle the on/off state.
5. Connect the Physical Power Button
If you want the physical power button to trigger the smart switch (similarly to how you would modify a light switch), connect the two POWER SW pins to:
-
For Sonoff: S1 and S2.
-
For SwitchBot: SW and L.
Alternatively, if you want the physical power button to bypass the smart switch and directly trigger the PC boot, you’ll need a POWER SW separator wire. This will split your motherboard’s power switch pins into two sets: one for the physical power button, and another for the smart switch.
Setting up the switch
-
Using Vendor Apps: Use the corresponding app for your switch: eWeLink for Sonoff or SwitchBot’s app for the SwitchBot Relay. Follow the in-app instructions for setup.
-
Configure Settings:
-
Set the power-on state to off to prevent the PC from accidentally booting due to any residual power.
-
For Sonoff: Set Inching to 0.5 seconds and enable Auto-off. If you wired the physical power button to the switch, set the switch mode to Follow.

-
For SwitchBot: Set the mode to Momentary Switch with an auto-off feature after 1 second.

Testing: Once configured, test the triggers to ensure everything works as expected. After confirming, enable Matter and connect the switch to your Matter platform.
Note: When using voice commands, use phrases like “Turn on PC” or “Toggle PC,” as the switch remains off most of the time.

Finishing Up
Finally, secure the wires and smart switch to your PC case. You can use a magnetic 3M sticker to attach it to the metal part of your case, ensuring it faces either the plastic part or a ventilation outlet. This placement ensures proper signal exposure, which is crucial for optimal performance, as it helps the signal travel through the case.
You should now be able to boot your PC remotely using a Matter switch!