For what seemed like ages, Apple fans all around the world waited patiently for the day when they could control their robot vacuums with Apple's Home app. That day has come and gone thanks to the industry's—and Apple's—transition to Matter, but now that it is here, what does Apple Home actually bring to the table, and how do you use it to control a robot vacuum?
The answers to these questions and more can be found in this guide.
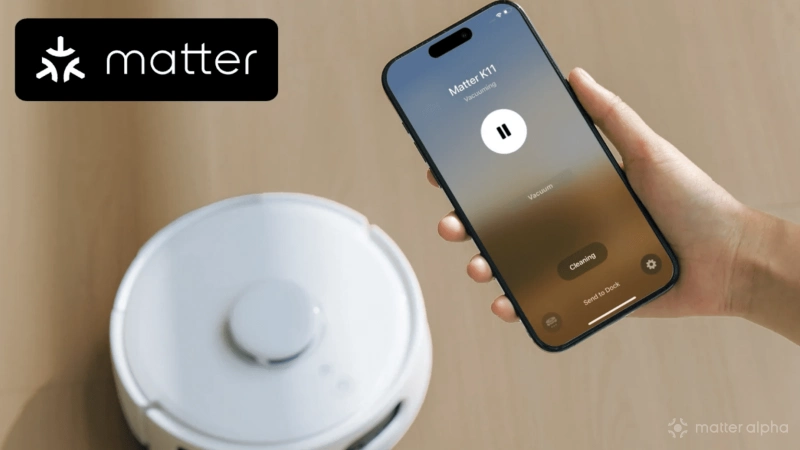
Apple Home and robot vacuums: convenient controls, limited capabilities

Before we walk you through all the ways that the Apple Home app can help keep your house clean, we first need to discuss its capabilities and limitations. As great as the Home app is, it is rather limited when it comes to robot vacuums, with a startling lack of support for features such as mapping, defining no-go zones, and adjustments for mop drying.
Because of this, we recommend keeping your robot vacuum's dedicated app installed to fine-tune your home's map and to ensure a smooth overall experience. That said, adding a Matter vacuum to Apple's Home app can still be quite useful for quickly launching some of the most common cleaning tasks either manually, via Siri voice commands, or through automation.
Currently, the Apple Home apps on iPhone, iPad, Mac, and Apple Watch support the following robot vacuum functions:
- Whole home cleaning
- Room selection and exclusion
- Pause, resume, and docking
- Suction and mop power settings
- Lost vacuum chime
- Status alerts and notifications
- Scheduling, scenes, and automation

K10+ Pro Combo
Also available at
It is also important to note that the availability of certain features in the Home app may be limited to specific robot vacuum vendors and models. We've seen this firsthand with Roborock vacuums, initially only supporting two vacuum suction settings, while owners of the SwitchBot K10+ Pro Combo have access to four.
The good news, though, is that robot vacuum device manufacturers have the ability to add more features through firmware updates. And, future renditions of iOS and the Matter specifications will undoubtedly expand on vacuum and mopping capabilities over time.
How to control Matter robot vacuums in Apple Home

As previously mentioned, there are multiple ways of controlling a robot vacuum in the Apple Home app. We've covered how to create and use scenes in Apple Home in a previous guide, and we will be devoting another just to automation, so we will focus on the robot vacuum-specific controls below.
How to start a whole home clean in the Apple Home app

- Launch the Apple Home app.
- Tap your robot vacuum.
- Tap Vacuum or Vacuum & Mop.
- Tap the Start button (looks like a play symbol).
Once you tap the start button, your vacuum will automatically begin a complete home cleaning using the map you defined in the vendor's app. Your vacuum will still respect any no-go zones and suction settings specific to each room, too.
How to exclude rooms in the Apple Home app
- Launch the Apple Home app.
- Tap your robot vacuum.
- Tap Vacuum or Vacuum & Mop.
- Tap Rooms.

- Tap Deselect All to clear all rooms, or tap a room to exclude it.
- Tap the Done button (looks like a check mark).
- Tap the Start button (looks like a play symbol).
The Apple Home app will remember your exclusions even after leaving the room selection screen. This gives you the opportunity to make any last-minute changes to suction power and cleaning type before starting.
How to adjust suction and mop settings in the Apple Home app

- Launch the Apple Home app.
- Tap your robot vacuum.
- Tap the Vacuum icon (bottom left corner).
- Tap the desired mode then tap the Start button to begin cleaning.
Suction and mop settings may vary depending on the model of your robot vacuum. In our example above, the SwitchBot S10 only has the Quick suction option for vacuuming, while it has Quiet, Max, Deep Clean, and Automatic modes for mopping.
How to locate a lost vacuum in the Apple Home app

Having trouble finding your robot vacuum after an error? Don't worry, the Apple Home app can help with that too.
- Launch the Apple Home app.
- Tap your robot vacuum.
- Tap the Settings icon (looks like a gear).
- Tap Play Sound to Locate.
After tapping Play Sound to Locate, your robot vacuum should play a chime sound to help with tracking it down. As with suction and mop settings, this feature may not function as intended for all robot vacuum models, even if it is available in the Apple Home app.
How to enable vacuum notifications in the Apple Home app
- Launch the Apple Home app.
- Tap your robot vacuum.
- Tap the Settings icon (looks like a gear).

- Tap Status and Notifications.
- Tap Include in Home Summaries for status reports.
- Tap Activity Notifications then Time or People to set conditions.
With notifications enabled, the Home app will send an alert to all of your Apple devices if a problem occurs during cleaning, and its device tile will show Alert for its status. Setting the Time and People options will allow you to restrict notifications based on the time of day or based on the location of those within your household.
The Include in Home Summaries option puts your current vacuum status at the top of the main view of the app, as well as in room views.
A sparkling clean is just a tap away with Apple Home
Even with its fair share of limitations, spending the few extra minutes needed to add a Matter vacuum to the Apple Home app is well worth the effort. Whether it is one-tap cleaning, using them in Apple Home scenes with other Matter accessories, or initiating a clean with Siri, the most commonly used controls will be just a shout or tap away.
In the market for a cleaning companion for your home? Then be sure to check out our buyer's guide to the best Matter-compatible robot vacuum cleaners for our recommendations, or stop by our product database to see a complete list of over 150+ options.